Thursday, May 5, 2011

Who's got Gas?


Has it really been 2 months since I posted? Man how time flies. Luckily I have my pictures to remind me where to pick up from. Let’s just hope I can remember enough to write more than just the picture's descriptions. So…hi. Umm… oh yes! The engine was picked up by Bobby the machinist…

So it’s 11am and I’m in the shop with a car that will not be running for a couple of months. What’s next? I looked the car over and thought since the tranny was at the shop and the engine on the way to it’s new temporary home, I figured I should pull apart anything else that needed to be fixed by someone other than me. I somehow happened to look at the radiator and remembered I was going to take it to a radiator shop and have it boiled(cleaned). Once it's cleaned out, the shop will tell me if I need to replace it or not. I figured I might as well start saving money by seeing if the current parts were re-usable instead of making EVERYTHING brand new. Thinking about the radiator pointed me in the right direction to start from.

Another thing I would be able to send to the radiator shop was the gas tank. It would also need to be boiled out to clean any leftover gas, or dirt, or turpentine that might be gunking up a 46-year old gas tank. So I started with the gas tank. (Which reminds me, I need to search for a gas cap) Well, I kind of started. As with the torque converter, I ran into another decision of laziness. The gas tank is in the rear of the car, with the filling tube above the bumper. This means to access certain places where the gas tank is connected to, I would need to open up the trunk.

Guess who left the trunk keys at home?

I’ve been trying to get into the habit of doing the right thing. Doing things I planned on, even if the lazy way was easier. Not in the mood to cook and do laundry? Stopping at the local bar for a few beers and dinner is always the lazy and easier way. I’ve almost had to slap myself to snap out of it and just head home. So with it being 11 am and the whole day to maybe go golfing or drinking or hanging out, I angrily got in my car and drove home to get the keys. Angry because I brought everything I normally do: my tools, my jumpsuit, my headlight/flashlight, my camera; but no keys.

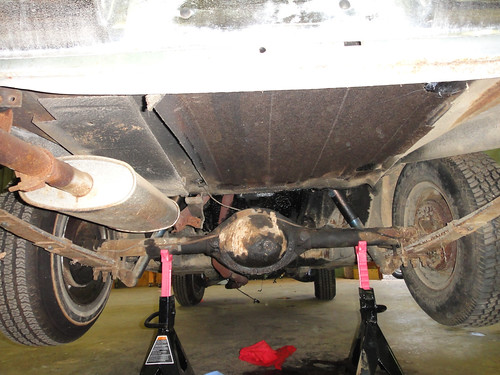
Fast forward, I have the keys and the trunk is open. I put the jack under the rear differential and raised the back end high enough to put a jack stand under the left and right rear axles. I lowered the axle onto the jack stands and removed the jack (yes I put blocks in front and back of the front wheels). I have to say, I was a little nervous about this. It’s been done for so many years and by everyone, but for some reason, while growing up, it was something my Dad and I never did. He said he never trusted jack stands while he was under a car. Looking back now, I find it funny that we didn’t trust the stands, but yet would trust a hydraulic jack on wheels that could move if you knudged it just enough. Anyways, I got under the gas tank and surveyed the situation as my eyes nervously darted back and forth to the jack stands.

Man was it dirty under there. Not only were there cobwebs, but there were also these dirt mound/nest/mudlike/turd-looking things around the edges. If anyone reading this recognizes what these are from the pics, please let me know. When I scraped them off, little rat dropping-like things came out. It was like petrified rat droppings. You have no idea how relieved I was to see this. I know it wasn’t really rat droppings and just some insect stuff, but I was just glad it wasn’t some ancient dirt cocoon holding some crazy ninja-like spider that I would have awakened to kill me. Disgusting! I’m getting goosebumps typing this remembering how creeped out I was under that tank. HAHA.

Back to the gas tank. So I removed the gas cap and a plate that surrounded the filler tube on the exterior of the car. That let me have access to the screws that attached to the filler tube's rubber grommet that creates the reservoir like crevice you normally see on a regular car when you open the little door that covers your gas cap. The rubber boot was stuck on the filler neck so it took me quite a while before I was able to wiggle it just a little bit loose. It was extremely stubborn, or seemed stubborn until I figured I should probably try to lower the tank, pulling it down so I could create more room to wiggle it off. So I started on the underside of the tank. With my car, there is a metal strap that runs basically from the bumper up towards the front of car to the end of the tank. The rear of the strap is locked into a groove by the bumper. The front of the strap is attached to a 22-inch bolt! There isn’t a socket on this planet that is that long, so I had to use a wrench. Since I’m “on a budget” with this car, I didn’t go buy those pop-whiz-bang ratchet-wrenches, so I had to turn the nut 278 degrees and then take the wrench off, rotate it back and start all over. Considering the nut was 9 inches up the top half of the bolt, I’m sure you sense what’s coming. It took forever to get it off. Working on your back, and actually having to hold your arm up for long periods of time and exerting 60% of your strength, trust me, you will get tired. I’m so out of shape that I had to take breaks every minute of turning. I disconnected the fuel gauge wire that attaches to the end of the fuel pump (and float) and removed the rubber fuel line hose from the end of the tank.

Tip # 237: Keep your mouth closed when you are working underneath stuff. Gas doesn’t taste very good.

With gas starting to leak, I jacked the car up a little more so I could fit a 5-gallon bucket underneath and catch the spillage. When I bought the car, the guy warned me not drive it very far. He said his friend only put a little bit of gas in it just to make sure it was running when I came to see it. So I bought a 5 gallon bucket to catch the radiator fluid when I was taking the engine out, and figured it would be great to empty out the fuel tank. I went back to unloosening the nut on the tank strap, mindful to stay clear of any gasoline over splash. I was almost done with the nut, which buy now had the tank resting on the bucket. With the gas tank lowered at an angle of almost pulling free of the grommet on the filler tube up above in the trunk, gas was still draining into the almost now full bucket. I pushed up on the tank and felt like I was doing a mediocre bench press. It still felt heavy to me. I chalked it up to being old and back then, they built things with real metal. Not that plastic stuff nowadays. So I went up top and was able to remove the rubber boot on the filler tube. It still came off with some struggle. I have made the mental note of lubing up the inside when I put it back on. With the boot off, the tank was now defying gravity by resting it’s front edge on the Home Depot bucket, and the rear being held by the filler tube’s angled neck resting against the hole in the trunk. With the bucket now 80% full, I “cleverly” decided that the guy’s friend put more in there than he thought. I wasn’t going to give up and leave the shop until that tank was clear from the car. So I got underneath it and pushed up on the front with one hand so that it was no longer resting on the bucket. With my other hand and shoulder, I pushed the bucket toward the front of the car so I would have more room to maneuver around getting the tank down. With both hands now on the front of the tank, I used my knees to push up on the rear of the tank trying to find an equilibrium of releasing the gravitational force holding the filler tube’s neck against the opening in the trunk. I then was able to contort my body clear and basically did a bench press of the tank as I lowered it onto my chest. This sucker was heavy. I was probably benching about 375 pounds (turns out it was about 100, more on that later). Still, imagine lifting a rectangle size object off your chest and to the side while keeping it level, clearing your head so no bat/spider/rat dirt nest crap gets in your hair (or open mouth) and laying it on the ground. It's pretty difficult.

I finally got the sucker down and out from under the car. Moving it around the shop was also hard because apparently, this thing was still full of gas. I drained about 4.5 gallons out if it and it still weighed like a rock. It was like moving a titter-totter with two fat kids on each end. Trying to hold it in the middle so I wouldn’t scrape it on the ground, god-forbid I create a spark and blow my self up, while the gas sloshed back and forth. So here I am straddling this thing, the gas going back and forth in the tank making it impossible to perfectly balance it, spilling spurts off gas out of both ends, shuffling step by step to get it our of the way and into it's own little resting place. I finally got it to a side of the shop and out of the way without too much damage.

Tip #238: When removing a gas tank, make sure you drive it around to get rid of the gas first.

I read that night that I have a 16-gallon gas tank. So obviously my 5-gallon bucket isn’t going to do the trick in removing the rest of the gas. In the words of Roy Scheider, I’m “gonna need a bigger boat” or bucket if you will. I decided this was a good stopping point. I cleaned up the shop and went home thinking of how I was going to empty that gas tank…DSC00356

Wednesday, March 9, 2011

Time to get this show on the road!

I'm far away from actually getting this car on the road, but I will half-heartily admit that I've done quite a bit so far. Pulling an engine and tranny together out of a car, while something I was confident in doing, was something I'd actually never done before. So I do feel like I've made some progress. The next step was to get the tranny and engine to respectable people do get them re-built. I did this with the tranny first. I found an AMCO Transmission shop near my work who said they'd take a look and get it fixed. This was a relief since the 7 shops I called before and after said "no" immediately when they heard how old and what type of tranny I had. I met Randal at 8am before work and talked to him about the job before him. I brought my TSM(technical service manual) and offered it to him in case he came to any tricky parts. He then took me out back to the paint shop they also had. Inside was purple 67' Pontiac GTO. It was the shop owner' car. They had been working on it for a couple of years now. He showed me this to brag (he did the paint) but also to let me know that this shop was full of experienced mechanics. I'm sure he saw the appraising look on my face as I told him my worries about it being so old, or checking to see they were up to date in being able to scour the internet or catalogues for places to find parts for my tranny. I gave him the websites I had found with full gasket and seal kits for it. Confident these guys knew what they were doing, and extremely happy with the price quotes Randal gave me, I left my transmission with them and went to work. It was a huge relief. All of the current hurricane of ideas and decisions I had to make about the car, suddenly felt like a cloudy day. Relief of knowing a professional was working on a major part of my car, but a small sense of defeat of not trying to do it myself. The dozen reasons for having a professional do the work won me over by the end of the day, and I felt a lot better knowing I finally took one step in the right direction of getting this car back on the road.

The next back-breaking process was finding a machinist, or engine rebuilder. I googled the hell out of the internet to only find auto-body shops around me. No real engine people. I got some numbers from people in the chat rooms. Some were disconnected, other were far away. The one number I got from the car show just rang and rang. By the end of the week, I was prepared to start the job myself, without the leveling and machining of course. It was 6pm on a Friday night when I decided to try the car show number one more time before leaving work. Luck be a lady tonight! Jim answered the phone. I told he'd come highly recommended and I'd like him to rebuild my engine. We talked for an hour or so about specs and performance upgrades and all sorts of mechanical data. He got on the internet with me on the phone and I directed him to the websites I'd found. I had wanted to get started right away and was hoping to get the engine to him that weekend. His schedule didn't really have room for me, so we scheduled a pickup at the shop at my lunchtime for the following Monday. I agreed to his quote and moved some of my savings into my checking account for a with drawl while I was still on the phone. I said my goodbyes and left work, and the heavy weight of that decision, to go get a much needed beer.

I was awakened the early Saturday morning by a phone call from Jim. His schedule opened up and he was actually heading into Atlanta that morning to drop off some other engine work he had done for a friend. I shot out of bed, got dressed, and grabbed my tools as I headed to the bank. Jim had said he wanted 80% up front. I totally understood that business hadn't been very good for him lately, and since the engine could take a while to be ready, he said he'd rather the customer put down a "deposit" for all the parts he'd have to order and the labor he'd put into it. I grabbed the cash and was still 15 min lat getting to the shop. I got out the car and unlocked the gate for him to back his truck down to the shop doors. He got out of the truck and we shook hands. He was a big fella. And I mean tall, not some bubba from the sticks. He had the face of James Gandolfini, but with long dark blonde hair like Friar Tuck. His big bear hands swallowed mine and I immediately knew he knew what he was doing. He proved this point even more by bringing me the schematics and dimensions of my engine. It was almost like a scene from Days of Thunder. He'd been up all night checking his catalogues and computer for the specs on my engine. He basically had everything planned out by the time I met him that morning. With the pleasantries over, we picked the engine hoist over, connected the engine, and lifted it into the back of his truck. Cash in hand, he took off and left me alone with a green car with no heart. I stared at my car for what seemed like an hour. Making sure I was ready for this. Knowing there was no turning back now. With the engine and tranny being rebuilt, I had little time to start getting the car back in shape before they were both back in the shop. Both back in the shop staring at me. Pressuring me to hurry up.

Monday, March 7, 2011

Filler

I've been real bad with updating here, but here's a little eye candy in the mean time

Scotts AMC Rambler Engine comes OUT! from cheer77@aol.com on Vimeo.

Tuesday, February 22, 2011

Not a writer

It's a good thing this blog is about a car, otherwise I'd feel like it was a diary.

So I went to this thing called the World of Wheels at the Atlanta Congress Center, a convention center. I don't totally know the basis of it. It's like a traveling show, except 80% of the cars were from Georgia. Other than winning the lottery, this was the best thing that could have happened to me. I was able to talk to people about where they got their work done, get numbers and business cards from vendors,and see some new ideas in person.

First gigantic score of the day was when I first got there. My girlfriend and I were standing in line waiting to buy tickets when a guy who could have been a distant cousin of Willy Nelson, came up and asked if I was buying tickets. Forgetting how nice people are in Georgia, I interrupted him and pulled on my no-pandering hat and said that I didn't have any cash on me so I had to use my credit card tobuy them from the booth(which was true, I only had $7 on me and figured I'd need it for snacks). He just smiled and said "I'm gonna give you tickets for free, if you want them." I waited for the catch, but there wasn't one. He and a buddy were actually part of the show. They were in a car club and had 5-6 cars on the floor. They had 2 extra passes because their wives didn't come. We said sure and followed them in. I talked to the guy a bit and he told me where his cars were and to stop by as he raced ahead to catch up with his friend.

***Side note: Since I've been in Atlanta, I've made a lot of trips home to LA to visit my friends and family. Doing this has let me rack up a lot of points that I can turn into upgrades. Because of this, I usually fly business class and I don't have to pay baggage fees. I joke about being spoiled and whether or not I can ever fly in coach with the common folk again (which I can and still do when the upgrades aren't available. I'm no Jenny from the block...).

So here I was, again, with a free upgrade. We didn't even have to wait in the regular line to get in. With our "All-Access" passes hanging around our necks with O'reilly Autoparts sponsored lanyards, we just went in through the owners section. Boo-ya!!

We went in and started in the direction of our benefactor's car section. Again we were lucky that his cars were basically at the first corner of the room, so we had a starting point without having to back track all-over the place. We found Jim Haynie surrounded by a bunch of Chevys. He had 2 cars there that day. A 57' Belair and a 64' Vette. Great looking cars. Best part about them? They were all drivers. Not daily driver(like mine is going to be), but unlike the other show cars that probably had odometers of 150 miles or less and sat in a garage like Cameron Frye's dad, Jim drove his around. A lot. Which to me, is even cooler especially on how great of shape they were in.

I touched on this earlier, but with most of the cars being from Georgia, probably meant that most of them had the work done in Georgia too. This leads to the Second score of the day. I asked Jim where he had his engine work done. If he had done it himself, or just had it machined, or just plain rebuilt by someone else. He gave me the name of the guy who did all his machine work. Said the guy really knew his stuff and made his engine work perfectly. I'd been calling places for 2 weeks trying to find a good machinist, but the Internet doesn't work when it comes to engine repair. All I got were collision shops that didn't really do the kind of work I was looking for. Or automotive shops that wouldn't work on something so rare or old.So this was my golden ticket to finally finding someone with not only a name and number, but a recommendation that I was actually able to see proof that the guy was good.

We walked around some more and met up with some friends from work. Ziggy, who owns my shop, was there with his family and the rock star couple of my UPM and Location Manager were there with their newborn daughter. It's always nice to see people outside of the office that you actually like, and I felt like I was part of the cool crowd.
We hung out for a bit and then went on our way checking out the rest of the cars.

Score #3 was when we walked by a 65' Mustang. The interior was awesome. I've been debating on whether I should post a pic of it, making it a surprise, but I figured I'd be showing you pictures of the process and not just wait for the finished car, so why not. This is really cool. I love how the mesh allows you to make the inner part of the seat 2-toned, while letting the whole seat be more than just light on the outside and dark in the middle. Not only might this be my color
scheme, but the pattern and mesh will definitely be the inspiration for what my seats are going to look like. I can't describe how cool I think it is. When I get frustrated about trying to figure out what I'm going to do with every-little-thing about my car,I'm totally at peace when I think of those seats.

I got some business cards and advertisements for some custom upholstery guys, chrome plating guys, and powder coating guys. All great stuff that I might be using, especially since the prices aren't as outrageous as I thought they would be. Still expensive enough for me to really have to pick and chooses what gets what, but it's nice to have affordable options.
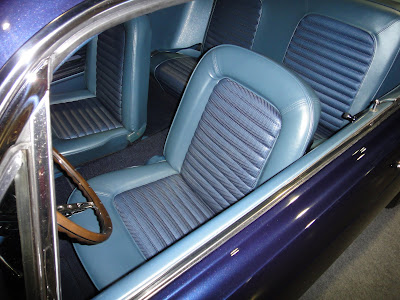
I saw one car that had a similar green that my engine compartment has, but the pics just don't do it justice. I didn't really see any of the colors of blue that I was hoping to see in person, so still can't make a decision on that (more of that later). There was one, but it was a little too dark for me. If you look at the door just below the window, the lighted part is close to the light blue I'm looking for.

So we left with my treasured phone number and websites to look at and went to eat. My mind about to explode with all the possibilities, and possible decisions one day I will HAVE to make....

Wednesday, February 9, 2011

Cold

Before


After
I'm so behind on these posts, it's taking me a while to remember what to write about certain days. Luckily, my photos are grouped by days, so they help provide a guideline of where to start and what to talk about. This post is supposed to be about cleaning the engine. The day wasn't really all about cleaning the engine. In fact, not much cleaning of the engine happened.

Atlanta was blanketed in snow, and that snow turned the roads all to ice. The type of ice I've never seen before. I know if I was you and was reading this from afar, I'd say "So what? Just get the snow plows out." Well, Atlanta, doesn't really have any snow plows. It really has no infrastructure at all for snow and icy conditions. It's a major metropolitan area that just shuts down at the very whisper of snow flurries. SHUTS DOWN! Work was cancelled all week for me. It would have been a great time to get some work done on the car, except for the fact that I had no way of getting to the shop. It wasn't really until Thursday that I could get in the car and drive, and I had to go into work to process stuff so people could still be paid Friday.

Back to the engine cleaning. I was able to get to the shop on Friday. The storm was well over, but the freezing conditions remained. Because of this, the shops driveway, which slopes down hill to the shop hanger doors, was still covered in frozen snow about 8 inches thick. There was no way I was going to be able to get my jeep (4x4 and all) down that hill. Wanting to stick with the shop's safety rules by parking my car behind the gates, I had to shovel an 8x10 section out of the ice so I could back my car just behind the gate. Anyone ever shoveled snow? It's not that hard, tiring, but not too hard. Well try shoveling ice. It does not come up to easily. The top layer came off fine, but the bottom layer insanely hard to get up. After 45 min worth, I lazily told myself it was good enough and backed the car in. Guess my measuring was off a little, as I had barely enough room to back the car in before it started slipping down the driveway. Nothing bad happened, the car stopped fine with about a foot of clearance for the swinging gates to close (whew). The best part about the shoveling, was it warmed me up!

Ah, but it didn't last for long. Let's just say this old shop/warehouse isn't really insulated well. The cold quickly attacked my poorly insulated fingers and toes. Cleaning the engine and tranny means using wet cleaners and water to spray it off. Rubber gloves do nothing to protect your hands from the cold. I'd even like to say that the wet parts felt even colder while wearing the rubber gloves. I was extremely unprepared for this. I lasted as long as I could before I had to take mini breaks and start messing around in the shop. Moving this and that, here and there. Any type of movement to get my body heat flowing. I even started to shovel the ice again at one point. I would spray the engine and tranny with degreaser and let it soak while I ran sprints or did jumping jacks.

Not sure if I've mentioned this or not, but the shop has no running water. Which makes it extremely difficult to wash things off, aka CLEAN AN ENGINE. There's no hose to spray the gunk and grime off. So luckily Ziggy(the shop owner) let me borrow a pump sprayer. It's a big industrial one that gardeners, and our work construction painters use all the time. It doesn't holds about 4-5 gallons, and boy does that go quick. These sprayers don't really have the best pressure, but it's all I have for now.

I'm gonna switch to another side subject (don't worry, I'll find my way back). I'd been researching places that might be able to do some work on the tranny and engine. I finally found a place that would service the transmission for me not too far from where I work. Transmissions are a completely different animal from an engine, and I wanted more experienced hands taking it apart and putting it pack together. I've also never seen the inside of a tranny, so I have no clue how things should look. I told the guy that I would bring it to him on the next Monday.

With that in mind, and not much water left to clean, I focused my efforts on cleaning the tranny . The tranny's aluminum casing made it a lot easier to clean since there really wasn't any rust to deal with. As you can see from the pics on my Flickr, the engine's iron block and headers are hard iron that have been rusted or have had heat spars occur making the metal extremely rough and discolored. With the tranny, it was just years and years of caked dirt, oil, and any other thing the road spit at it, that was caked on it. It was just a matter of soaking, degreasing, brake cleaner, and wire brushing before it came off with noticeable results. If I'd have been able to get all the grime off of it, you would have thought it was almost brand new. I ran out of water and decided to call it a day. I had bought a tarp and placed in the back of my jeep so I could protect it from the still greasy and wet tranny from doing any damage to the cars interior. I put the bell housing in the car as well so I could send them to the shop together in case they needed it too.

That Sunday, I took the tranny and bell housing to a do-it-yourself car wash. I wanted to really get the gunk off of it before giving it to the transmission shop. Armed with a pocket full of quarters, I set the pressure washer hose to the engine degreaser setting (which is more like Simple Green) and used the full five minutes spraying over and over every little nook and cranny of both object. Another round of quarters and I turned on the high power soap. This is a million times better, maybe a billion times better than the pump sprayer (sorry little pump sprayer, but it's true). It's stripped away any loose grime with ease. The real caked stuff that I wasn't able to get to with the wire brush, still stayed in place, even with the high powered water offense I was hitting it with. I used another handful of quarter to just super-soak the tranny and bell housing to rinse it off of all the soap and degreaser. If I had let it sit in the degreaser for a half hour, I probably could have had better results, but the lines were backing up and I didn't want to have to move all the gear and go to the back of the line and do it all over. I was satisfied I had done a pretty good job and knew that the transmission shop would give the tranny it's own steam bath to clean it all anyways. Besides, I had to get going so I could make the local "World of Wheels" car show that was at the convention center.

But more on that later....

Tuesday, February 1, 2011

With the giant relief of safely pulling the engine out of my car behind me, I went back to the garage the following week to “finish” the job. After the engine pull and covering most of my mess with cat liter,I admit that I left the garage in little bit of turmoil.

The engine was still half hanging/half resting on some blocks off the ground with the transmission sitting not too far away surrounded by fluid, cat litter, and chunks of grease.

The first thing I had to do was to pull the torque converter off of the back of the engine. This is the part of taking apart cars that I hate. In mechanic speak; it was a bitch to take off. Lot’s of swearing, and scraped hands took place for the next 2 hours. Oh yeah, I said it. Six bolts took me 2 hours.

The bolt heads that connected the torque converter to the “cam shaft plate?” were extremely hard to get out for a number of reasons. The main reason it took so long (other than figuring out how I was going to attempt it) was that the access to these bolts was in a narrow gap between the flywheel back of the converter and the dust plate that butts up to the back of the engine.

The only thing that would fit in this gap was a wrench. This takes forever, especially in this case because of the limited arc range I had. You have to turn the bolt a couple of inches, take it off the bolt, rotate the wrench back and turn again. Another reason was that these bolts were tightened so tight, using the small wrench, gave me no leverage to loosen the bolts. My beloved torque wrench had to sit and watch me use every, and I mean every, ounce of strength I had. The final problem was that the torque converter, essentially being connected directly to the camshaft, had nothing to stop it from turning in the direction I WAS PULLING TO LOOSEN THE BOLTS. I liken this to the same problem people have when they try to change a tire. They usually jack the tire up before loosening the bolts. With the wheel free spinning and not having the ground to hold it in place, they just keep turning the wheel. This deflated me for 20 minutes or more as I fought a losing battle of trying to hold the converter still as I tried to wrench the bolts loose. No matter how hard I pushed the converter forward as I pulled backwards on the wrench, my pushing arm, with not really any place to put a good grip, was no match for my pulling arm.

I scratched my head and circled the engine a few times trying to decide on whether to give up. My brain finally turned on and I remembered that the torque converter is connected to the camshaft, which on the other side of the engine is connected to the damper unit. One more look at the damper unit and “Yes!” there was a big nut on the end. With a nut, comes a place to connect another wrench, giving me something to hold on to, creating more leverage. Unfortunately, with it being on the other side of the engine, meant I would not be able to hold one end and pull on the other. My wingspan is nowhere near long enough. Oh well, I may have been defeated, but at least there was a way to easily remove the torque converter with another person. But that meant I would not be able to put the engine on a stand, my soul purpose for the day. I picked up my torque wrench to start packing up, but my never-lose attitude took over, which a little ingenuity too, if I may say so myself. With the engine being straddled by the two long legs of the engine hoist, my torque wrench was just long enough to hang onto the damper nut, and reach under one of the legs. If I could somehow defeat gravity and keep the torque wrench on the nut without having to hold it, then I could focus all of my strength on loosening the converters bolts. It took a few attempts, but I was able to get the wrench to hold on as I slowly turned the bolts (and converter with them) until the torque wrench on the other side had enough tension holding it in place as it’s arm was being pulled against the under side of the engine hoist leg. Imagine a clock with its hands moving clockwise. As the second hand passes the 10 and heads for the 12, point and stick your finger on the 11. As the second hand pushes against your fingertip, it will stop. Now imagine you are on the other side of the turning bar that turns the clock hands. Eventually you will be able to keep going clockwise,while the other side is being held tight.

With an agonizing slowness and a couple muscle jerks, I was able to finally wrench a bolt free. I literally shouted, “That’s right asshole!! Huunnhhh!!!” The next 5 bolts never got any easier, but eventually I was successful.

With 2 hours of my day gone, it was finally time to hoist the engine high enough to connect the engine to the stand. I’d seen it done a million times and was halfway from putting the back plate on the engine that would slide into the stand, when I realized I didn’t have any bolts long enough to reach the engine through the plates

holding arms. I couldn’t believe it. I looked at every bolt I had and none of them would work. Normally, you use the same bolts that connected the transmission or bell housing to the engine. I had 2 that would work, but I needed two more. Unbelievable. Again it seemed as if someone was telling me not to put it on the stand. Should I just call it a day, take my torque converter victory and go home? I started to think of what I needed to do to the car. With doubts about it being too big of a project, too much money, what color to even paint the car, not enough time in the day, etc… running through my mind (kind of like a mid life crisis if you will, something that since than happens a lot haha) I decided “you know what? Who cares if the day is almost over? You’re not going to get it back, and you’re going to run out of days to get this done. DON”T BE LAZY.” So I locked up the shop (more on that later) got in my car and drove to the nearest hardware store (Lowes 20 min away) and bought 2 bolts to complete the task. I drove back to the shop, unlocked everything and finally put the damn engine on it’s stand and wheeled it into it’s own space in the garage.

With the engine out of the way, I was able to move the hoist and transmission into their own spaces, leaving the drying mess of fluid and cat litter wide open to clean up. I cleaned that space better than room I ever had when I was a kid. I broomed and dusted every little drop and spec I could, making it look better than it did before. I pushed my car into a little corner giving the shop more space, so the owners saw that I was a responsible person and wouldn’t always leave the place a mess. Hopefully this will give me leeway when I started taking apart the interior and need the space to spread everything around.

With the place looking in order, I packed up and left. To finish from earlier, the shop or garage, can be locked down like Fort Knox. It’s not in the greatest neighborhood, so there are lots of steps to take to make sure I’m safe, especially since I’m normally the only one there. First, when I drive up, there is a gate to a side driveway that leads down to the shop part of the building with its garage doors. You have to get out of the car, unlock the gate, swing open the gate, get back in the car and roll down to the shop (30ft). Then you have to walk up the slope, close the gates and lock them up. The only access inside the actual building is from the front door. Just incase there are thieves reading this, I might have said too much already, but let’s just say there are 3 more locks and 4 doors to get to the shop before you can open the hanger doors. It’s like walking into a Get Smart safe room without the lasers and eye scanners.

Whew, that was a long one.

Saturday, January 22, 2011

Up and Out


Well Folks, here's the big entry. The engine has come out of the car! It seems like I did this forever ago, but it's been less than a month. It wasn't really as hard as I thought it was going to be. Thankfully I've become a little more mature than the 24-year old I sometimes still think I am, and took my time. After thinking everything was disconnected, I spent most of time trying to figure out how to actually hoist the engine out. Should I disconnect the transmission and only pull the engine? Or should I keep them attached and pull them out as one piece? Luckily I got some help. When I first thought about buying this car, I scoured the web for any and all info I could gather. Were parts still available? Were there shop manuals? Did anyone know about them? The web was full information. My decision on buying came from the fact that I was pretty confident that there were enough clubs, forums, and "old" guys out there who would be able to help or steer me in the right direction with the car. I utilized these forums for the first part of my classic car journey. I fired off questions to 2 different forums, and sent emails to the Presidentsof the 2 Rambler clubs I had officially joined. That's right, I'm a member of 2! Car clubs! So my questions were the same as I had asked above: Pull them out separate, or together? I got about 7 responses and all of them were helpful. I've found that with the internet and my friends, it's hard to read people's intentions or voice, but I think I've been a pretty good judge of character, even if just from some typed words. It was nice to be able to notice when someone was just being sarcastic or running off on technical facts than actual good advice. The winning advice was to pull the engine and tranny together (I will refer to the transmission as the "tranny" from now on. No wise jokes out of you Cruiser.) With that question out of the way, my next dilemma was where to put the lifting points on the engine. I actually lost some sleep over this. I was afraid I'd choose the wrong positions, or bolts to hold the chain attached to the engine hoist. Nightmares of the engine crashing down on the ground, or worse, part of the car, were a constant fear the week leading up to pulling it out. Back to the forums I would go. I posted pics of my position points and got a couple of responses. One of my spots was good, but the 2nd one at the rear of the engine was in question, one of my questions to begin with. So I noticed I had bolt holes on the side of my engine that could be used as position points and decided I should use those. The only problem was that these empty bolts holes had no bolts. So I read around a little more, with no luck on if people had used these before. Most of the pics and videos I saw were of guys wrapping a chain around the bottom the engine to do it, and that was just the engine alone. I did find info on what strength of bolts I should be using, so I made the choice of finding 6-grade steel bolts that would fit in these portholes on the side of the engine. I found bolts that were about ½ an inch too big. Whether this is right or not, my redneck logic told me to put some nuts on the bolt, to make it “seem” like there wasn’t half an inch of the bolt exposed that might make it bend.

Wrong or not, it worked. The bolt held. I say bolt but it was actually 2 bolts. In the midst of my delirious fear about lifting the engine, I decided on buying an engine leveler. This device is amazing. I don’t think it’s possible to lift an engine and a tranny out together if you didn’t have a leveler. The leveler has 4 chains with L-brackets attached to the bottom of the chains. These chains hang from a support beam that hooks to the engine hoist. On top of this beam is a turning rod that allows you move the center of the leveler allowing the load to raise, drop or level out. There are two chains at each end so that one chain can attach to one side of each the back or front of the engine. I attached both chains at the back-end of the engine to the two backside engine holes.

So, here I am, with the hoist attached to the engine, the correct (or doable) bolts holding the engine up, and it’s time to go. I had detached the engine mount brackets from the engine as the last measure of holding the engine to the car, and started hoisting away. The bolts held and did not bend or break or slip off. Finding the correct level with lifting and the leveler was a bit of a task, but I eventually got the engine to where it was ready to lift out. As I pumped away at the hoist, the engine didn’t seem to be going anywhere. I looked around and found one cable that before hadn’t looked like it was connected to anything. Well, apparentlyI forgot to detach the speed-odometer cable that was attached from the firewall to the left-middle side of the transmission. So another 8-minute delay, and the speedometer cable was detached. I went back to raising the engine and got it as far as I could before it needed to switch the hanging position. The front part of the engine was above the front wall/grill of the car, but the rest of the engine and tranny were sloped in a downward angle that was preventing it from moving forward and out of the car. Luckily my girlfriend and the owner of the shop, Leslie and Ziggy, were there to help. So I moved the engine and tranny to a diagonal position as Ziggy and I lifted the back of the tranny up and over the front of the car as Leslie pushed the car back so the engine and tranny would clear.

SUCCESS!!!!!!!!!

After we got the engine and tranny out, we lowered it so I could remove the tranny from the back of the engine.

That was enough for one day, so I cleaned up as much as I could (leftover spilled radiator fluid and leaking tranny fluid-red stuff) and took off.

Tuesday, January 18, 2011

Slow Going

It has been a while, but I'm not that good of a writer. Lazy is more like it. Anyways, I was able to get some work in during the holidays. With all of the radiator fluid dried up, I was able to really get under the car and take some pictures. With the radiator out, and this being a really simple engine, there wasn't too much left to do other than stare it and tell myself "I was really going to have to pull out the engine." So after a little staring, I started disconnecting everything so nothing would be in the way of taking out the engine. The first thing was the alternator. I got a torque wrench for Christmas which gave me plenty of leverage to loosen the bottom bolt. The wrench allows you to really put power behind your turning and it has been a must have tool for me since. The alternator's upper bolt was connected to a flat metal bar with a slot inside of it that stuck out from the front of the motor below the water pump. Once the bolt was loosened, the alternator was able to tilt closer to the engine, producing enough slack to removing the fan belt. Once I removed the belt, I then removed the alternator and put them both on the workbench.

I then removed the electric wires from the starter, the shift linkage cable, the throttle cable, and a spring that was connected from the throttle cable bracket on the engine to the bottom of the master cylinder for the brakes.
I'm not sure what the
spring was for, so I think it probably should have been attached to something else since it didn't seem like there was a working purpose for it, and maybe someone just connected it wrong.

After that I got under the car and placed my jacks under the engine's oil pan with a wood block on top, in hopes of
not damaging the oil pan, and one under the transmission. After they were firmly supported, I went to work on the drive train. Unfortunately, this is where I had to stop. The retaining nut was huge and none of my tools would fit it. I couldn't believe it. It was nearing late afternoon, so I decided to just pack up and attempt the engine removal
another day, instead of just racing the the nearest hardware store for a pair of channel lock pliers or vice grips. So I cleaned up and took more pictures. I also took the rest of my chrome side moldings off with the same
luck I had with the first one. All clips are still intact.

More pics have been added to my Flickr account so check it out.